Introduction to Matrix Web Systems
Matrix Web Systems is a hybrid publishing architecture designed to take the administrative busywork out of website management. Rather than maintaining dozens of isolated database installations, your sites resolve using our lightweight portable templates connected back to a single cloud command center.
How it works
We split your publishing network into two distinct layers:
C3 Dashboard
The Central Command Center (C3) for your entire website portfolio.
Access your single cockpit at c3.matrixwebsystems.com. From here, you can manage webhosting provisioning, generate AI articles, create header images via Imagen, track SERP keyword positions, and sync Google Search Console & Analytics APIs across all your sites seamlessly.
Portable Template
A lightweight, ultra-fast website framework deployed directly to your hosting server.
A SQL database-backed PHP/HTML/CSS code structure deployed on your hosting server that fetches menus, articles, dynamic layouts, and configuration data directly from the C3 backend.
Quick Start Guide
Deploy your first high-performance custom-domain website and connect it to your C3 dashboard step-by-step.
Part 1: Provision Your Webhosting Package
Follow these step-by-step instructions to initiate your cloud hosting deployment in C3:
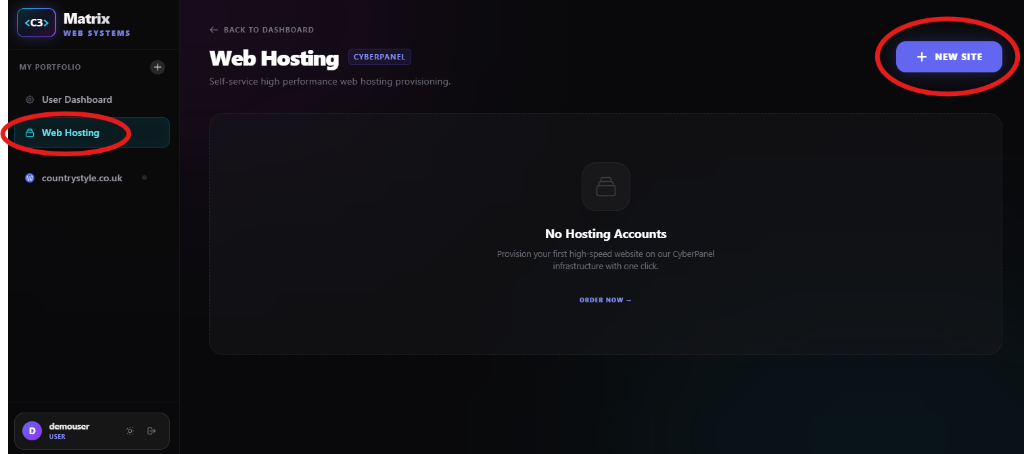
Step A: Navigate to "Web Hosting" & click "+ NEW SITE":
Click on Web Hosting in the left sidebar dashboard and select the "+ NEW SITE" button in the top right corner.
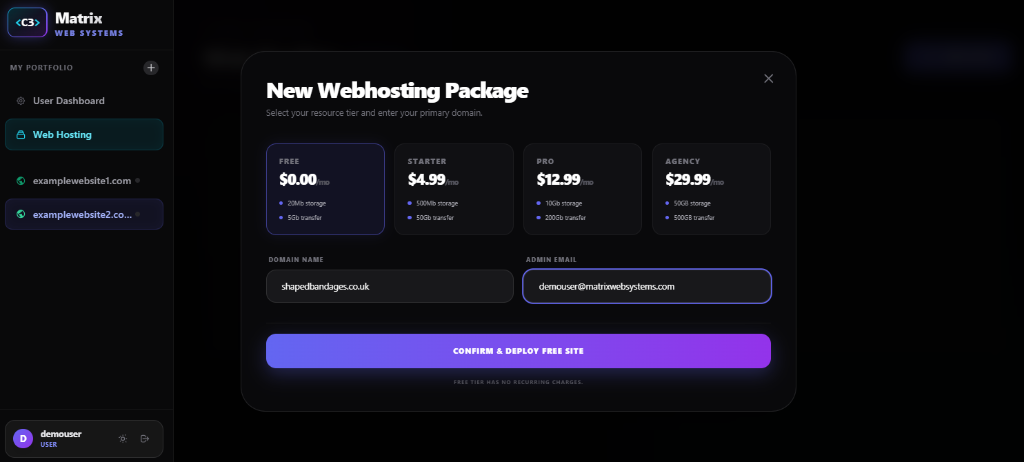
Step B: Choose resource tier & enter domain details:
Select your package tier (e.g. Free $0.00/mo), enter your primary domain name and admin email address, then click "CONFIRM & DEPLOY FREE SITE".
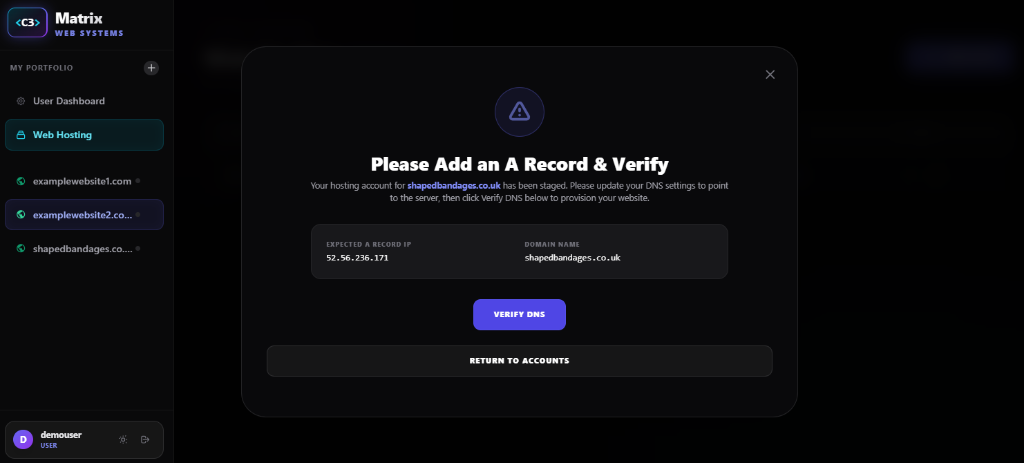
Step C: Add A Record & Verify DNS:
At this stage the domain is staged awaiting confirmation of the A record (Part 2). If not already done, you may click "Return to Accounts" and "Verify DNS" once the A record is active. If the A record is already in place, click "Verify DNS" and go to Part 3.
Part 2: Point Your Domain DNS
Log into your domain registrar (GoDaddy, Namecheap, Hostinger, etc.) and add new DNS record. The IP address will be the same as Part 1 Step C:
| Type | Name | Priority | Content | TTL | |
|---|---|---|---|---|---|
| CNAME | www | 0 | shapedbandages.co.uk | 300 | Delete Edit |
| A | @ | 0 | 52.56.236.171 | 60 | Delete Edit |
Part 3: Verify DNS & Retrieve Credentials
Once your DNS records are active, verify the domain connection to complete server provisioning and retrieve your credentials:
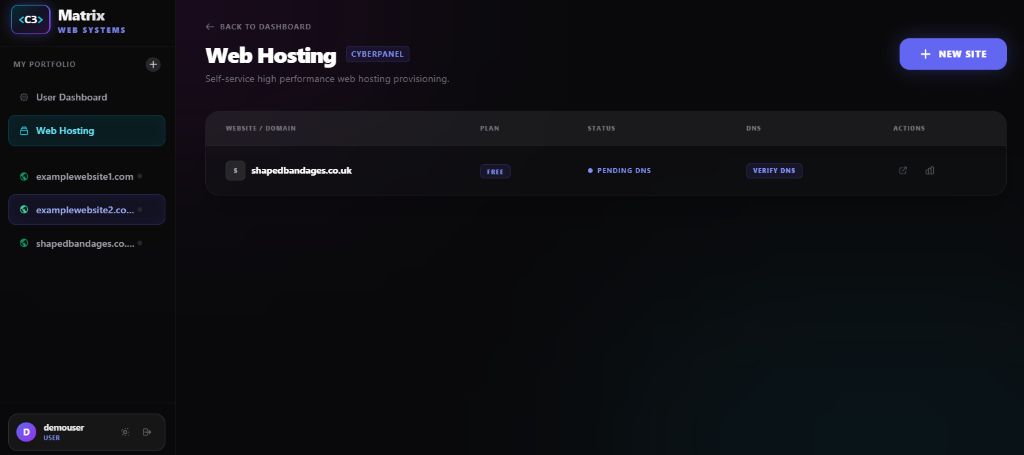
Step A: View Pending DNS Status:
Your site will appear in your hosting table with a status of PENDING DNS. Click the "VERIFY DNS" button (once the A record is in place) to proceed with verification.
Step B: Automatic Provisioning & CyberPanel Configuration:
Once clicked, C3 will run through the install of the hosting package.
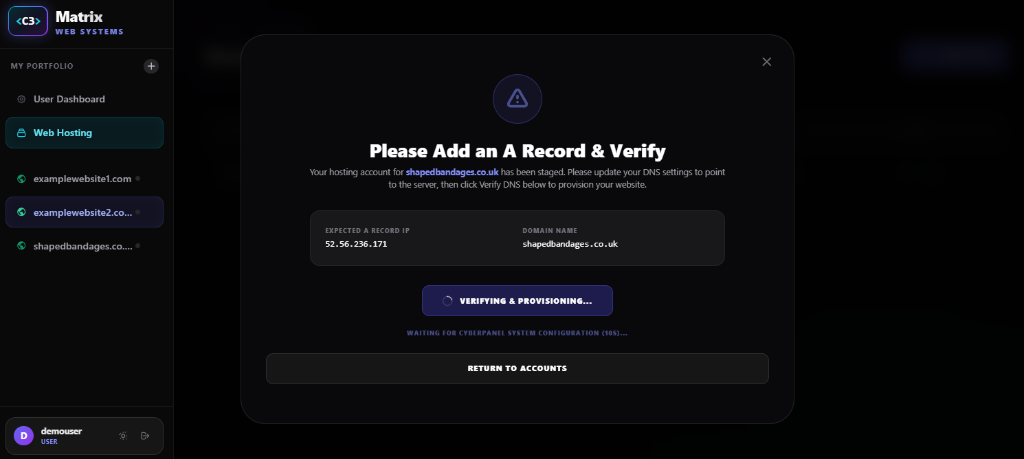
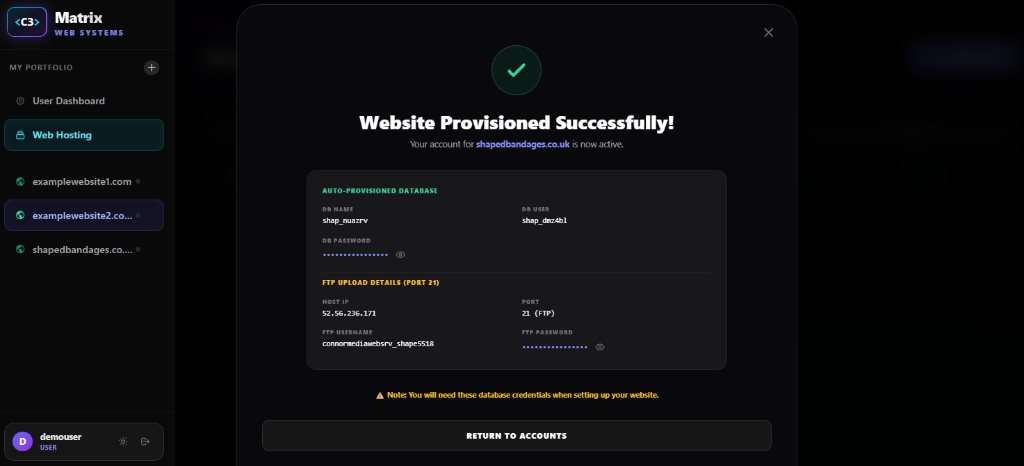
Step C: Provisioning Success & Access Credentials:
Once complete, a confirmation box will display your auto-provisioned Database Name, DB User, DB Password, and FTP Upload Details (Host IP, Port 21, FTP Username, FTP Password). Make a note of these as you will need them later (don't worry, you can always come back to this screen).
Part 4: Configuring the website
Configure your live site using your hosting manager and provisioned details:
Step A:
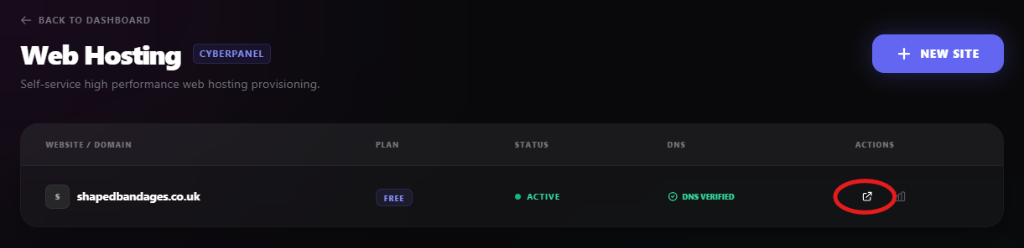
The Hosting package is now live and can be seen in the "Web Hosting" section. Click the "Visit website" icon under Actions to go to the provisioned website.
Step B:
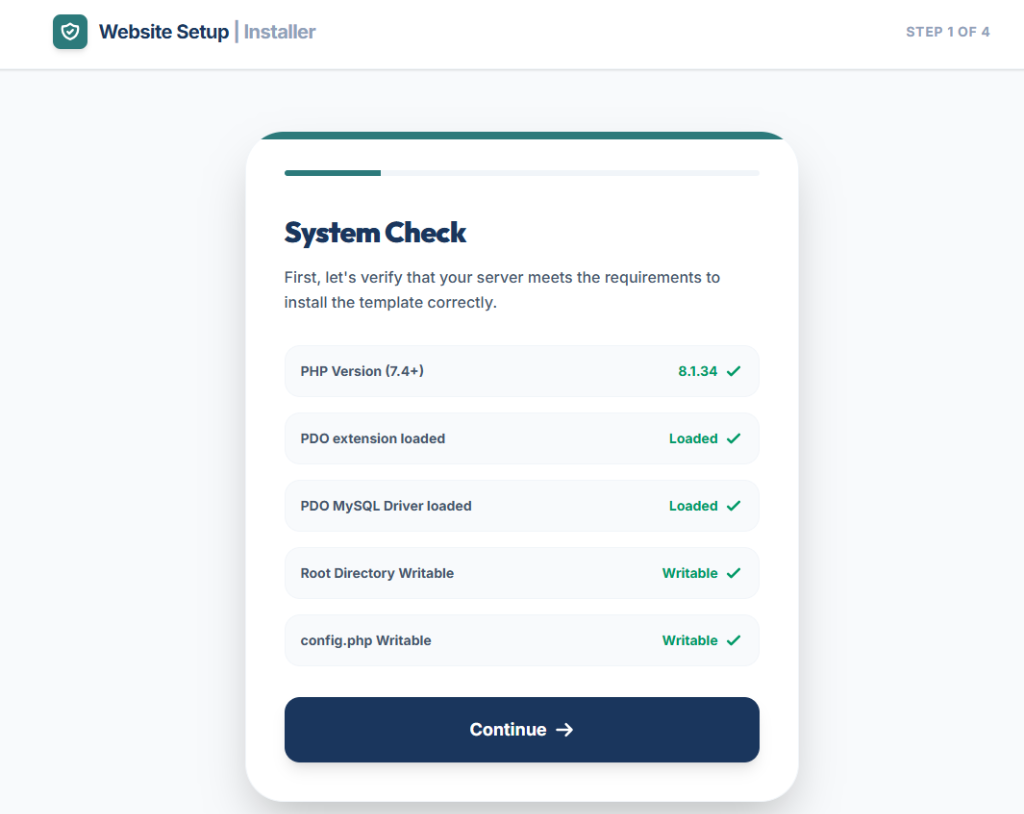
You will now be presented with the "System Check" page. Click "Continue →" if all are green.
Step C:
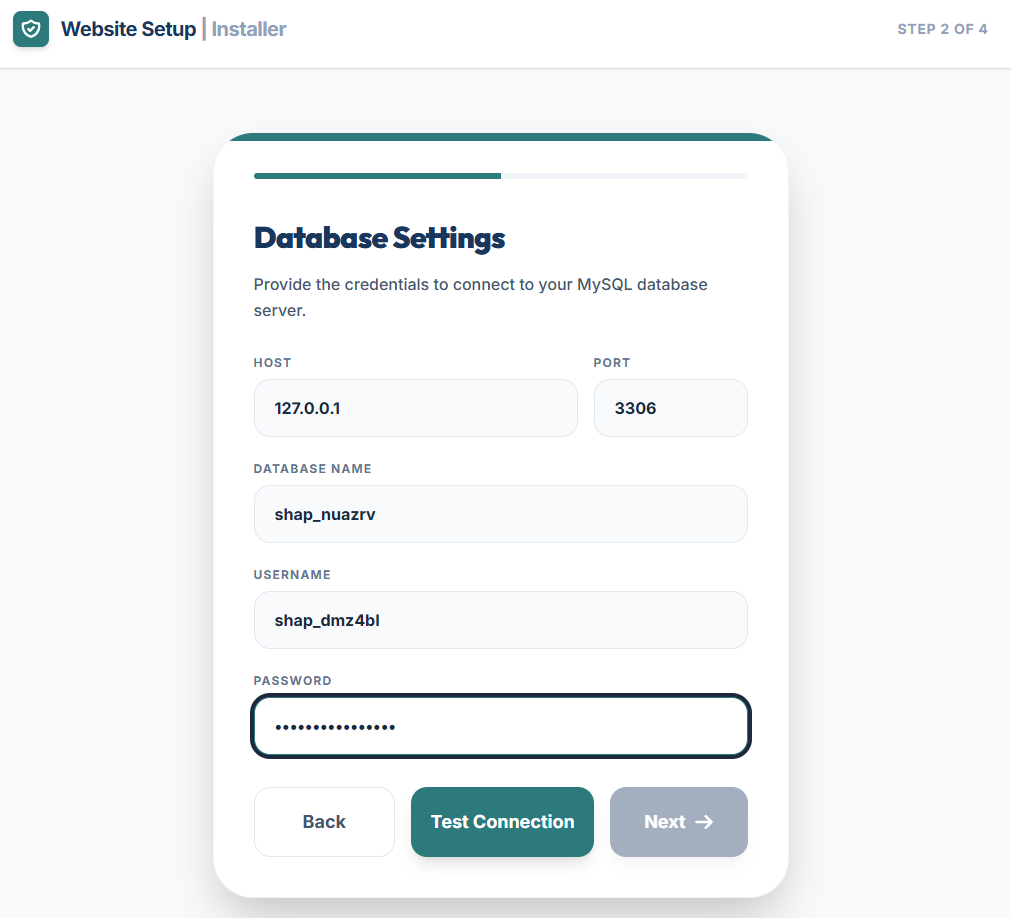
Fill in the relevant details (from the previous step), leaving the Host and Port as default. Click "Test Connection" to ensure everything connects in the background, then click "Next →".
Step D:
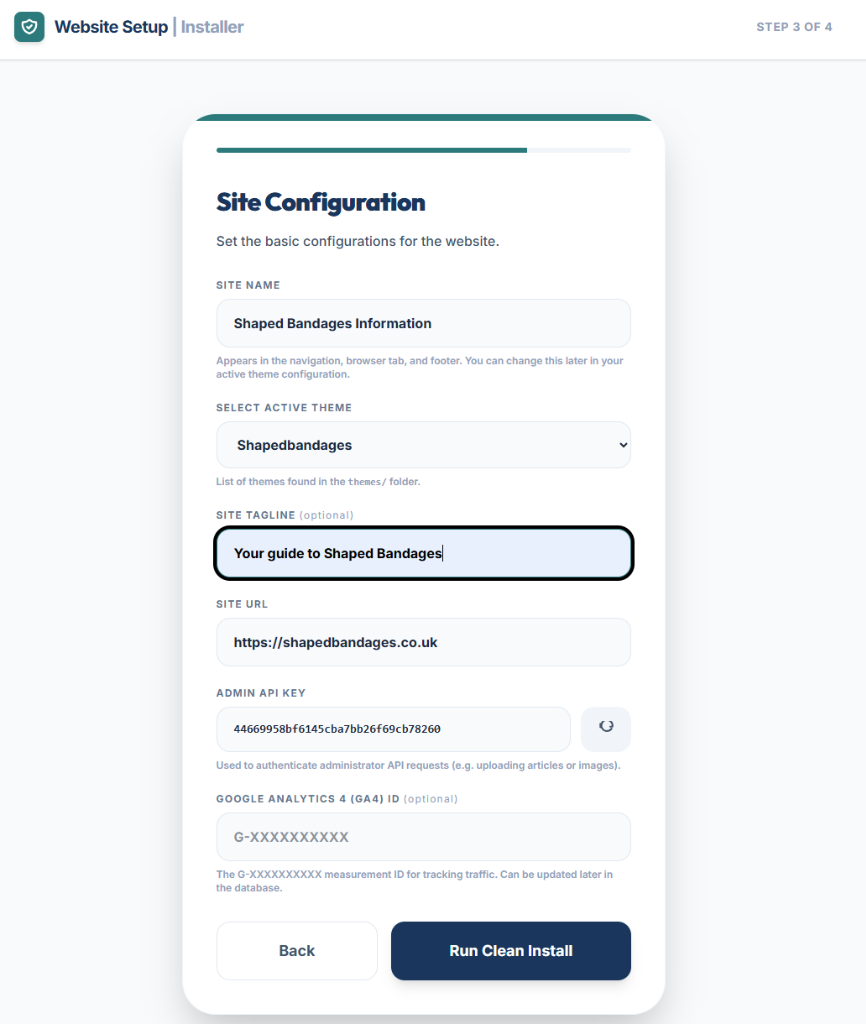
On the "Site Configuration" page, edit the Site Name and Site Tagline. You can select a theme or keep the standard theme (more coming on that in the future). Make a note of the "Admin API Key" (we will use this later). You can add your Google Analytics (GA4) ID now or it can be done later. Once all that's done, click "Run Clean Install".
Step E:
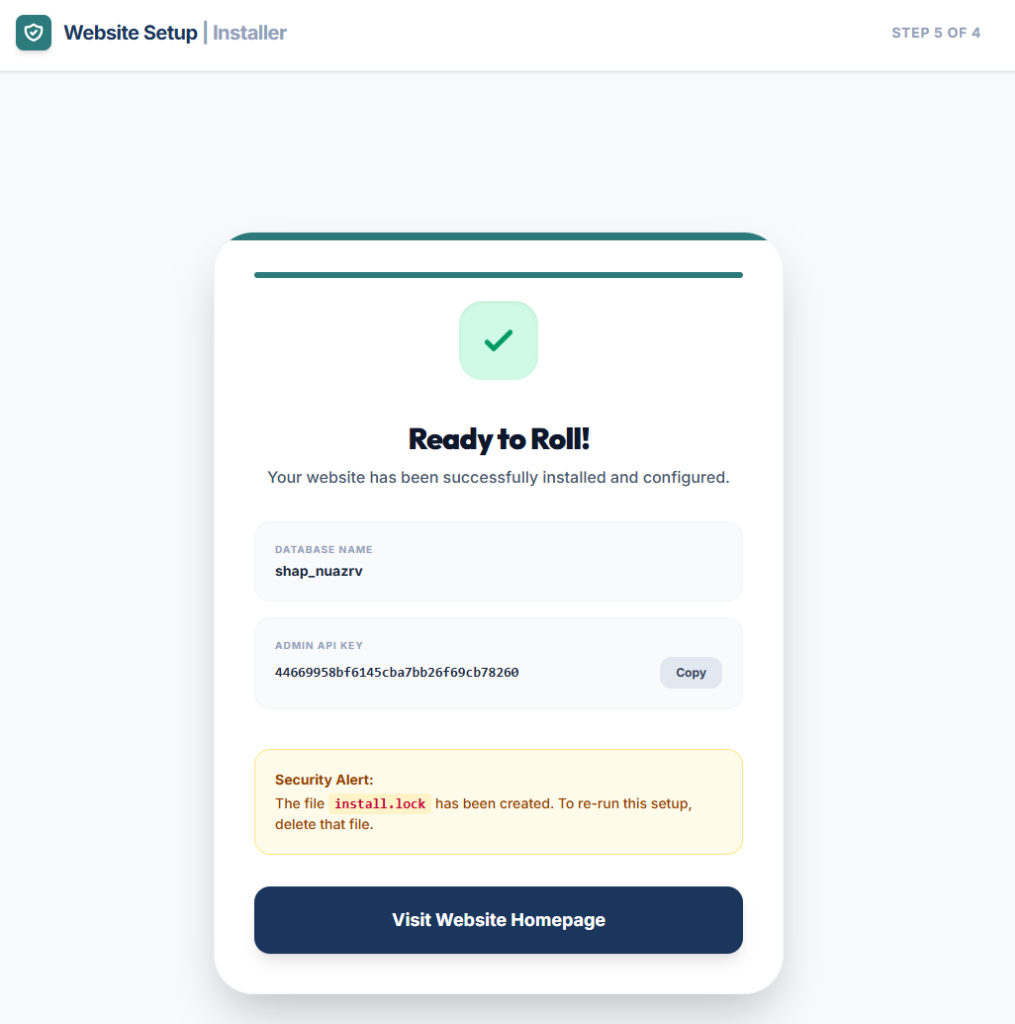
A confirmation box will be displayed, giving you another chance to copy the Website API Key. Click "Visit Website Homepage" to view the start of your new website.
Part 5: Connect Analytics & Publish
Click "Connect Google Account" inside your site dashboard settings to authorize GA4 and Search Console. You are now fully configured to generate your first article draft, create Imagen header assets, and publish it live!
Part 1: Provision Your Webhosting Package
Follow these step-by-step instructions to initiate your cloud hosting deployment in C3:
Step A: Navigate to "Web Hosting" & click "+ NEW SITE":
Click on Web Hosting in the left sidebar dashboard and select the "+ NEW SITE" button in the top right corner.
Step B: Choose resource tier & enter domain details:
Select your package tier (e.g. Free $0.00/mo), enter your primary domain name and admin email address, then click "CONFIRM & DEPLOY FREE SITE".
Step C: Add A Record & Verify DNS:
At this stage the domain is staged awaiting confirmation of the A record (Part 2). If not already done, you may click "Return to Accounts" and "Verify DNS" once the A record is active. If the A record is already in place, click "Verify DNS" and go to Part 3.
Part 2: Point Your Domain DNS
Log into your domain registrar (GoDaddy, Namecheap, Hostinger, etc.) and add new DNS record. The IP address will be the same as Part 1 Step C:
| Type | Name | Priority | Content | TTL | |
|---|---|---|---|---|---|
| CNAME | www | 0 | shapedbandages.co.uk | 300 | Delete Edit |
| A | @ | 0 | 52.56.236.171 | 60 | Delete Edit |
Part 3: Verify DNS & Retrieve Credentials
Once your DNS records are active, verify the domain connection to complete server provisioning and retrieve your credentials:
Step A: View Pending DNS Status:
Your site will appear in your hosting table with a status of PENDING DNS. Click the "VERIFY DNS" button (once the A record is in place) to proceed with verification.
Step B: Automatic Provisioning & CyberPanel Configuration:
Once clicked, C3 will run through the install of the hosting package.
Step C: Provisioning Success & Access Credentials:
Once complete, a confirmation box will display your auto-provisioned Database Name, DB User, DB Password, and FTP Upload Details (Host IP, Port 21, FTP Username, FTP Password). Make a note of these as you will need them later (don't worry, you can always come back to this screen).
Part 4: Configuring the website
Configure your live site using your hosting manager and provisioned details:
Step A:
The Hosting package is now live and can be seen in the "Web Hosting" section. Click the "Visit website" icon under Actions to go to the provisioned website.
Step B:
You will now be presented with the "System Check" page. Click "Continue →" if all are green.
Step C:
Fill in the relevant details (from the previous step), leaving the Host and Port as default. Click "Test Connection" to ensure everything connects in the background, then click "Next →".
Step D:
On the "Site Configuration" page, edit the Site Name and Site Tagline. You can select a theme or keep the standard theme (more coming on that in the future). Make a note of the "Admin API Key" (we will use this later). You can add your Google Analytics (GA4) ID now or it can be done later. Once all that's done, click "Run Clean Install".
Step E:
A confirmation box will be displayed, giving you another chance to copy the Website API Key. Click "Visit Website Homepage" to view the start of your new website.
Part 5: Connect Analytics & Publish
Finalize your website configuration by linking Google Analytics and Search Console endpoints.
Click "Connect Google Account" inside your site dashboard settings to authorize GA4 and Search Console. You are now fully configured to generate your first article draft, create Imagen header assets, and publish it live!
Hosting Options
Matrix Web Systems offers two flexible hosting configurations depending on your engineering workflow.
1. Managed Hosting
Let us manage the infrastructure. Simply point your domain name using an A Record, and we will handle LiteSpeed database caching, SSL certificate renewals, image compression pipelines, and regular backups automatically.
2. Self-Hosted Templates
Want to use your own server? Download the pre-configured PHP/MySQL template ZIP file from C3 and host it on your own server (Cpanel, VPS, or CyberPanel). The template queries your cloud command center to pull content automatically.
Managed Hosting
Let us manage the infrastructure so you can focus on building and scaling your high-performance content network.
Simply point your domain name using an A Record (as outlined in Part 2), and our automated CyberPanel setup will handle LiteSpeed database caching, SSL certificate renewals, image compression pipelines, and regular backups automatically.
Self-Hosted Templates
Deploy your C3-powered website on your own custom web server hardware or hosting provider.
Want to use your own server? Download the pre-configured PHP/MySQL template ZIP file from C3 and host it on your own server (cPanel, VPS, or CyberPanel). The template queries your cloud command center to pull content and updates automatically.
4. Setting up your Dev environment
Follow these step-by-step instructions to set up your local development environment and customize your site templates.
1. Local dev server
Running your site on a local development server lets you test layout changes, CSS custom styles, and PHP logic instantly before deploying to production. Setting up a PHP webserver is a must
There are many Webservers / DB server out there and setting these up is out of scope of this documentation
Some popular webservers and database all in one packages are:
- XAMPP
- WAMP
- Caddy
2. Getting the files
Now that you've fully setup your website on our WebHosting plan, you want to design your website your way. You can either , or suggested option would be to pull them over FTP.
File Download Steps:
- (to open Portable Template documentation)
- Click the download button
FTP file download steps:
- Connect to your server via SFTP/FTP using your host credentials (Section 2, Part 3 Step C).
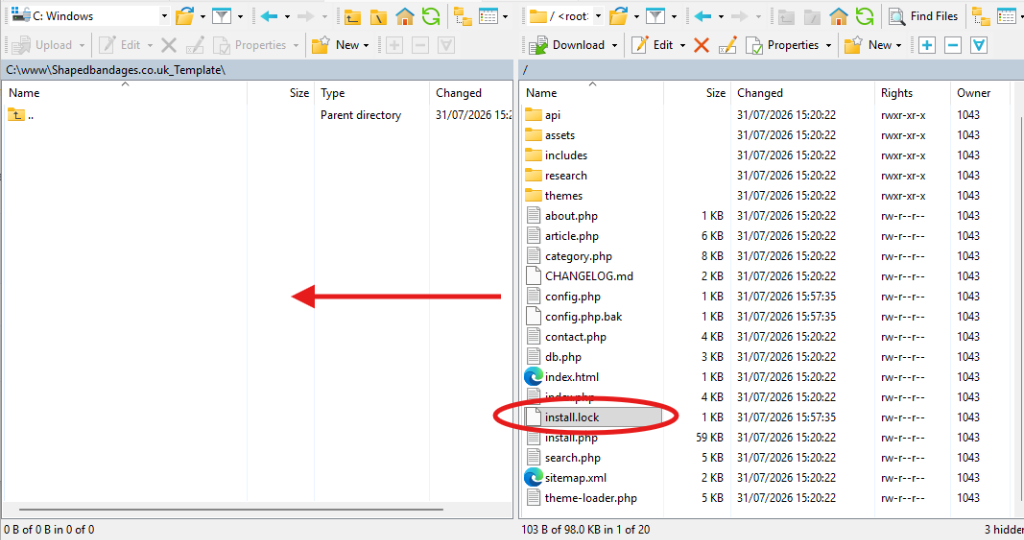
- Once connected with your favourite FTP client, copy all the files from your remote website to your local web dev server. In my case, my webserver serves pages from here
C:\www\ShapedBandages_Template. Drag and drop all files (DO NOT COPY THE "install.lock" file. This will allow us to easily setup the website locally to have a mirror image of your live site).
3. Setting up the DB
You only need to create an empty database, create a user with a password, and grant access to the database. The portable template installer will take care of the rest automatically.
MySQL Command Line Database Creation:
# 1. Log into MySQL command line
mysql -u root -p
# 2. Create an empty database
CREATE DATABASE site_local_db CHARACTER SET utf8mb4 COLLATE utf8mb4_unicode_ci;
# 3. Create user, set password, and grant access
CREATE USER 'site_user'@'localhost' IDENTIFIED BY 'your_password';
GRANT ALL PRIVILEGES ON site_local_db.* TO 'site_user'@'localhost';
FLUSH PRIVILEGES;
EXIT;
Once created, the template installer will configure all database tables automatically upon initial setup. You can change the Database Name (site_local_db), Username (site_user), and Password (your_password) respectively to values of your choosing.
4. Setting up the local site
Run the web installer wizard to connect your local site files to your newly created empty database and complete local site configuration.
Step A: browsing to your local website
Open a web browser and go to http://localhost (or whatever address and port your web server has been setup with).
Step B: System Check
You will now be presented with the "System Check" page. Click "Continue →" if all are green.
Step C: Database Settings
Fill in the relevant details (from the previous step), leaving the Host and Port as default. Click "Test Connection" to ensure everything connects in the background, then click "Next →".
Step D: Site Configuration
On the "Site Configuration" page, edit the Site Name and Site Tagline. You can select a theme or keep the standard theme (more coming on that in the future). Make a note of the "Admin API Key" (we will use this later). You can add your Google Analytics (GA4) ID now or it can be done later. Once all that's done, click "Run Clean Install".
Step E: Ready to Roll
A confirmation box will be displayed, giving you another chance to copy the Website API Key. Click "Visit Website Homepage" to view the start of your new website.
5. Making some changes
Now that your local dev server is running and your site files are synchronized, open the project workspace in your favorite IDE (such as AntiGravity IDE). AntiGravity provides intelligent code completion, real-time AI pair-programming, and instant previewing for PHP/HTML/CSS templates.
Setting up AntiGravity IDE for Template Editing:
- Open Workspace: Launch AntiGravity IDE and select File → Open Folder..., navigating to your local template directory (e.g.,
C:\www\ShapedBandages_Template). - Configure PHP & Tailwind Extensions: Ensure PHP Intellisense and Tailwind CSS extensions are active for live syntax highlighting and autocompletion.
- Edit Core Files: Modify site branding, custom CSS styling (
custom.css), and header components directly in AntiGravity. - Live Local Preview: Save your changes and preview them instantly in your browser at
http://localhost.
6. Uploading your changes
Once you have customized your template files and verified your changes locally, upload your updated files back to your live web hosting server (this is the reverse of "Getting the files").
FTP Upload Steps:
- Connect to your server via SFTP/FTP using your host credentials (Section 2, Part 3 Step C).
- In your FTP client, select all updated site files from your local web dev server directory (e.g.
C:\www\ShapedBandages_Template). - Drag and drop all customized files from your local machine to your remote website root directory on your live web server.
Note: DO NOT upload the "config.php" file. This file is specific to your local environment.
Setting up the DB
Create an empty MySQL database and grant user access using the MySQL command line interface (CMD).
You only need to create an empty database, create a user with a password, and grant access to the database. The portable template installer will take care of the rest automatically.
MySQL Command Line Database Creation:
# 1. Log into MySQL command line
mysql -u root -p
# 2. Create an empty database
CREATE DATABASE site_local_db CHARACTER SET utf8mb4 COLLATE utf8mb4_unicode_ci;
# 3. Create user, set password, and grant access
CREATE USER 'site_user'@'localhost' IDENTIFIED BY 'your_password';
GRANT ALL PRIVILEGES ON site_local_db.* TO 'site_user'@'localhost';
FLUSH PRIVILEGES;
EXIT;
Once created, the template installer will configure all database tables automatically upon initial setup. You can change the Database Name (site_local_db), Username (site_user), and Password (your_password) respectively to values of your choosing.
Setting up the local site
Run the web installer wizard to connect your local site files to your newly created empty database and complete local site configuration.
Step A: browsing to your local website
Open a web browser and go to http://localhost (or whatever address and port your web server has been setup with).
Step B: System Check
You will now be presented with the "System Check" page. Click "Continue →" if all are green.
Step C: Database Settings
Fill in the relevant details (from the previous step), leaving the Host and Port as default. Click "Test Connection" to ensure everything connects in the background, then click "Next →".
Step D: Site Configuration
On the "Site Configuration" page, edit the Site Name and Site Tagline. You can select a theme or keep the standard theme (more coming on that in the future). Make a note of the "Admin API Key" (we will use this later). You can add your Google Analytics (GA4) ID now or it can be done later. Once all that's done, click "Run Clean Install".
Step E: Ready to Roll
A confirmation box will be displayed, giving you another chance to copy the Website API Key. Click "Visit Website Homepage" to view the start of your new website.
Making some changes
Open your local site project in your favorite IDE (such as AntiGravity IDE) to customize your site templates and styling.
Now that your local dev server is running and your site files are synchronized, open the project workspace in your favorite IDE (such as AntiGravity IDE). AntiGravity provides intelligent code completion, real-time AI pair-programming, and instant previewing for PHP/HTML/CSS templates.
Setting up AntiGravity IDE for Template Editing:
- Open Workspace: Launch AntiGravity IDE and select File → Open Folder..., navigating to your local template directory (e.g.,
C:\www\ShapedBandages_Template). - Configure PHP & Tailwind Extensions: Ensure PHP Intellisense and Tailwind CSS extensions are active for live syntax highlighting and autocompletion.
- Edit Core Files: Modify site branding, custom CSS styling (
custom.css), and header components directly in AntiGravity. - Live Local Preview: Save your changes and preview them instantly in your browser at
http://localhost.
Uploading your changes
Upload your local design edits and customized template files back to your live web hosting server via FTP.
Once you have customized your template files and verified your changes locally, upload your updated files back to your live web hosting server (this is the reverse of "Getting the files").
FTP Upload Steps:
- Connect to your server via SFTP/FTP using your host credentials (Section 2, Part 3 Step C).
- In your FTP client, select all updated site files from your local web dev server directory (e.g.
C:\www\ShapedBandages_Template). - Drag and drop all customized files from your local machine to your remote website root directory on your live web server.
Note: DO NOT upload the "config.php" file. This file is specific to your local environment.
Getting the files
Obtain your site's portable PHP template package to begin designing and customizing.
Now that you've fully setup your website on our WebHosting plan, you want to design your website your way. You can either , or suggested option would be to pull them over FTP.
File Download Steps:
- (to open Portable Template documentation)
- Click the download button
FTP file download steps:
- Connect to your server via SFTP/FTP using your host credentials (Section 2, Part 3 Step C).
- Once connected with your favourite FTP client, copy all the files from your remote website to your local web dev server. In my case, my webserver serves pages from here
C:\www\ShapedBandages_Template. Drag and drop all files (DO NOT COPY THE "install.lock" file. This will allow us to easily setup the website locally to have a mirror image of your live site).
Local dev server
Set up and run a local development server for real-time design testing and debugging.
Running your site on a local development server lets you test layout changes, CSS custom styles, and PHP logic instantly before deploying to production. Setting up a PHP webserver is a must
There are many Webservers / DB server out there and setting these up is out of scope of this documentation
Some popular webservers and database all in one packages are:
- XAMPP
- WAMP
- Caddy
Google Data Sync
C3 links directly with Google API endpoints to feed clicks, traffic metrics, search keywords, and indexing statuses into your dashboard.
Search Console & GA4 API
Connect your Google Account to automatically pull organic performance data. C3 displays cumulative CTR, click volume, page-level visitor stats, and target queries inside your site overview.
Google Indexing API Integration
Usually, new articles take weeks to index. Whenever you publish an article from C3, the portal automatically dispatches index requests directly to Google's Indexing API, forcing crawler action in minutes.
SERP Rank Tracking
Monitor keyword performance without purchasing expensive external software.
Matrix Web Systems integrates an automated ranking engine. You can add target keywords manually or import them via CSV query exports.
Our background worker processes rankings via Serper.dev every night at 02:00 AM. Charts render 90-day progress sparklines so you can track ranking fluctuations dynamically.
AI Content Factory
Generate ready-to-publish SEO copy and matching feature graphics inside your publishing workspace.
Google Gemini Article Writing
Input target description prompts and keywords to generate full, formatted posts. The engine adheres to target tone constraints and formats heading structures automatically.
Imagen 4.0 Style Presets
Generate custom header images matching your article content. Select from style presets (Cinematic, Minimalist, Vintage, Cyber Tech) to create professional photography. Asset files are named to match post slugs automatically.
AI Customization Guide
Because our website template is written in clean, database-backed PHP and CSS, you are not locked into clunky block editor GUIs.
You can download the template ZIP file, open the files inside your local code editor (like VS Code, Cursor, etc.), and use AI assistants (like Antigravity or Copilot) to customize it visually:
"Convert this PHP index layout into a dark-mode minimalist portfolio theme with tailwind hover animations"
Once your style modifications are complete, simply upload the CSS and PHP files to your host server. As long as you preserve the core API call blocks, your site will continue syncing posts from C3.
C3 CLI Tools
Authenticate your local development terminal to sync templates, pull site assets, or push bulk changes directly from your command line.
Install and Login
$ npm install -g @matrixwebsystems/c3-cli
# Log in using your secure C3 dashboard key
$ matrix login --token c_tok_99d18fa28...
Synchronize Workspace
$ matrix sync --domain mydomain.com